Panel upgrades
Step 1
Step 1
Step 1

If you've got an old panel and its time for an upgrade, contact us and we'll come take a look, pull all the permits for you, and schedule a day to upgrade your service.
Step 2
Step 1
Step 1

Once we're on the jobsite we'll have to break the stucco around the panel. The proper way to do this is with a hammer, but as you can see in the photo we do a good job of keeping the damage to a minimum. Please note that we do not repair the stucco or cover the repair.
Step 3
Step 1

Next we feed the wires into the new panel and finish the installation. Now you have an upgraded service and brand new panel that will last for years to come.
Step 4
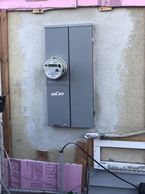
The last step of the process is patching around the panel. Again, we do not handle that part of the upgrade, but above is a photo of how good the patchwork will turn out when a panel change is done correctly.
Now that you've gotten a little peek into how the process of the upgrade works are you ready to improve your home and get started? If so, head to the "Contact Us" page and we'll get the ball rolling on your new panel as soon as possible